JellyPages.com

Followers

Sunday 31 March 2013

Happy Easter and Happy 3rd Birthday to Callum!

Happy Easter to everyone! Hope you all have a lovely day with your families and friends and eat lots of chocolate eggs!

Today is a double celebration in our house as it's our third child's 3rd Birthday! Wee Calpal as he's affectionately known has opened loads of pressies and cards and we have more family coming in the afternoon for roast beef and all the trimmings! He is a huge Star Wars fan but every supermarket in the vicinity has been sold out of Star Wars cakes all week so he admitted defeat and chose a football themed cake - black and white with football boots on!

The cake is quite fitting given that my crafty daughter has made Callum a birthday card - with a football theme! She picked some boys Smirk papers from my stash and some matching coloured card, some matting and layering - with help from myself - and some gold peel offs to finish the card and he loved it!


For my card for Callum, i've used the Kaiser Crafts Technologic 6.5" paper pack with a chipboard 3D robot embellishment from the same line. Some matting and layering onto a 6x6 Kraft Card blank and one of the pop out borders along the bottom. 


One of the papers is a repeat pattern using keyboard keys, so i've cut out the letter for his name and adhered these with 3d foam onto a die cut tag also from the paper pack. 


A silver '3' and some kraft Card Candi finish the card and he loved it!

Enjoy your weekend and the holidays if you have time off.... or your kids have!
Be back soon with my first DT project for Tsunami Rose Designs and this week's challenge entry - #13 Altered Journal!

Mo xxx

Wednesday 27 March 2013

'You're SEW Special...'

Well, I am on a roll with the Tsunami Rose Designs printable papers! I am totally out of my comfort zone.... scrap that - i am changing my comfort zone!!! I got a pile of lace ribbons in the post today and i will be ordering more tomorrow when i've got a few more pennies in the bank! I'm also loving the little flowers i've been using recently - I bought loads of these about 10 years ago when I started card making and haven't used them on anything since then - there are times when I'm glad I hoard!

I also found this fabulous set that my sister-in-law-to-be gave me for Christmas 2011... It had sat on my bookshelf feeling unloved but when i found it today I just know I'll be using the elements soon!! There are fabulous flowers and tags and twine and glassine envelopes and bling!!!


Well, the paper i'm using today is the Tsunami Rose Designs 'Vintage Clothes Pin' in Sepia which you can find in her online shop here! As soon as I saw it, it reminded me of clothes and ribbon and I dug out a kraft dress form, dressed her in lace and added a flower. The card blank is a Craftwork Cards Bobbin card - these are on clearance just now on their website!


I stamped some needles and thread on the background with my Tuxedo Black Memento ink pad and also stamped bobbins and a measuring tape on kraft card which i cut out. The purple colour is a Pro-Marker in Maroon and the measuring tape and dress form have some Dusty Concord Distress Ink on them too.


I wrapped some gold stretchy cord around the bobbins and to make a 'waist' on the dress form and attached everything with 3D foam. A length of my new purple lace was attached along the bottom of the card with Cosmic Shimmer acrylic glue.


Hope you like!!
I'll be back at the weekend with my sons 3rd birthday card! He picked the robot for it!
Mo xxx


Here are the links for all your Tsunami Rose Design needs -

Tsunami Rose Blog: http://tsunamirosedesigns.blogspot.com/
Tsunami Rose Zibbet shop: http://www.zibbet.com/tsunamirose
Tsunami Rose Etsy Shop: http://www.etsy.com/shop/TsunamiRose
Tsunami Rose Facebook Page: http://www.facebook.com/tsunamirosegraphicdesign
Tsunami Rose Facebook Group: http://www.facebook.com/groups/tsunamirosedesigns/ 

Tuesday 26 March 2013

Let's do the Time Warp!?

I am loving Tsunami Rose Designs! I am so excited at being on their Design Team and I have another card using some of their fabulous papers today!


This is a 6x6 paper called 'Vintage Clocks' in Sepia and you can find it here. I have distressed the paper by scrunching it up and using my Tim Holtz distressing tool on the edges, i've then added some Vintage Photo distress ink to the edges and creases. I adhered some pearlescent copper card to the white card base and attached the paper.


I found this really cute steampunk digi stamp by Vince over at Crafty Moments - he has this for free download in distressed, coloured or plain outline. I've then used some vintage seam binding ribbon, some jute chord that i've coloured with vintage photo and soem burgandy roses to compliment the ones in the image.


Glossy accents has been added to the roses and watch face on the image to add a bit of sheen - I think it was still drying when I took the photos! The 'Time' sentiment is a rub-on from a set that i bought in a pound shop several years ago - this was a completely inspired find today and i'm quite sure i'll be using the others from the set soon!

Here are the links for all your Tsunami Rose needs -
Tsunami Rose Blog: http://tsunamirosedesigns.blogspot.com/
Tsunami Rose Zibbet shop: http://www.zibbet.com/tsunamirose
Tsunami Rose Etsy Shop: http://www.etsy.com/shop/TsunamiRose
Tsunami Rose Facebook Page: http://www.facebook.com/tsunamirosegraphicdesign
Tsunami Rose Facebook Group: http://www.facebook.com/groups/tsunamirosedesigns/ 

And, if you're really quick, there is still a few hours to get in on this weeks Wednesday Challenge #12 Colour Inspiration here.

Mo xxx

Sunday 24 March 2013

"Wishing you the happiest of days..."

Today i've created a 6x6 card using Tsunami Rose Vintage Rouge papers in both the Black and the Black and Pink.

I covered a white base card with burgandy paper and then adhered a slightly smaller size of the Vintage Rouge Black to the card with some dusky pink lace ribbon down the left edge. I covered different sized tags with the two variations of the paper, added burgandy grosgrain ribbon and gold stickles around the edges.


I found a sentiment stamp for the top right corner and used my Versamark to stamp this, adding gold embossing powder. Using a glue pen, I ran glue around the edges of the card and added more gold embossing powder. My trusty heat tool was dug out of storage for this - I haven't used a heat embossing technique for quite some time! I'm just glad it still worked!


This vintage image is also from Tsunami Rose Designs and I added more gold stickles around to make a frame for the vintage image.

Here are the details for all your Tsunami Rose needs!!!
Tsunami Rose Blog: http://tsunamirosedesigns.blogspot.com/
Tsunami Rose Zibbet shop: http://www.zibbet.com/tsunamirose
Tsunami Rose Etsy Shop: http://www.etsy.com/shop/TsunamiRose
Tsunami Rose Facebook Page: http://www.facebook.com/tsunamirosegraphicdesign
Tsunami Rose Facebook Group: http://www.facebook.com/groups/tsunamirosedesigns/


You still have time to join us at the Tsunami Rose blog for the Wednesday Challenge - #12 Colour Inspiration

Hope you're having a wonderful weekend! 
Mo xxx

Friday 22 March 2013

Tsunami Rose Designs Challenge #12 - Colour Inspiration

You will (hopefully!) know by now, that I have made it onto the Tsunami Rose Designs DT from April and I am super excited about this! I cant wait to sign up for the DT projects and get working! In the meantime I figured I would work on building my stash of Tsunami Rose products and I thought that I would enter the remaining challenges in March.... the prizes if I'm lucky enough include sets of Tsunami Rose Journal kits and credit to spend on printables from the Tsunami Rose shop.


Please hop on over to the Tsunami Rose Blog and join in this week's Colour Challenge - have a look at the fabulous inspiration from the design team this week - the creations are stunning!!! Cards and albums and even an Ice Cream Sundae!! This month we are promoting the 'Life Abloom' Printable Journal Kit which you can find here!

So, I dont have a lot of TRD papers at the moment - luckily for me, the challenge does NOT require the use of Tsunami Rose products - anything goes as long as you stay within the other criteria for the challenge.

I have looked at the DT inspiration several times in the last few days and given that it is a 'Colour Inspiration' challenge, I have decided to work with the pinks and florals that appear in the 'Life Abloom' kit and the DT samples. I've covered my card with pearlescent pink paper and inked the edges in 'Worn Lipstick' distress ink.


The products i've used to create my card for this challenge are mainly from Craftwork Cards - a Birdhouse shaped card blank, paper flowers from the Flower Fusion Pad, 'Princess' Card Candi, also some Star Dust Stickles and a length of lace ribbon tinted with 'Worn Lipstick' distress ink.


Here's a close up of the flowers - i've used candi coated in stickles for the centres and stickles on each of the candi along the edges of the card. 


My sentiment was printed on Safmat and hasn't quite come out the way i wanted - its more noticeable than I would have liked especially on the white centre - however, i'm working with a new printer and i think this will just take some practice to get it right!

I'm taking this to my friend's house tonight with a bottle of something sparkling and a big bag of crisps - should be a good night... the snow is getting heavier though... this might not be a great idea!

Mo xxx

Wednesday 20 March 2013

Sariah's Birdhouse Card!

Well, i just had to pop back for my second post of the day to show you what Sariah has made just now!
She was looking at my Birdhouse shaped cards and I reluctantly gave her one! She found a Papermania Spring Collection of papers and chose this one with the crosses on for Easter (She asked me to cut the paper as its a difficult shape!). She raided my candi drawers and has used pastel candi with gold stars on and a Happy Easter peel-off sticker. Sariah then asked me to make her a green bow - she even found the ribbon she wanted and pulled out the bow maker so it was all ready for me to do!!!


To finish she popped another candi on the centre of the bow.

A very cute card - I'm sure the recipient will love it, Sariah!
Mo xxx

WOYWW #198 & Birdhouse Shaped Cards

Well my little crafty corner looks pretty much the same as always - bit messier than usual as i didn't tidy away all my bits when i was finished last night - just went to bed! You can stop by and have a nosy at crafty tables across the world with Julie over at Stamping Ground!


Only noteworthy things on there are my birdhouse shaped cards - I made two yesterday afternoon while the babies were napping and a Christmassy one last night while catching up with The Walking Dead! Also, on the desk are two sheets of Tsunami Rose Designs Vintage Rouge in Black for my next project with them - you can buy your paper here. Have a wee look at yesterday's blog post for some exciting news about me and Tsunami Rose! I like to have things around me to inspire me and figured if I have the paper ready to go I'll come up with something interesting to use it for!

I was inspired by a recent Craftwork Cards Blog entry by Marie Chillmaid who had created a St Patrick's Day Card using the Craftwork Cards Birdhouse Shaped card blanks and lots of green and white card Candi! I have made a couple of birdhouse cards before now but made another three yesterday! And now my daughter is hovering over my shoulder asking if she can have a go at making one... I might relent and let you all see the outcome in a few days!


So here are close ups of the cards I made yesterday -  This first one uses the Sweet Pea paper pad and flowers with a 'Special Day' sentiment. Lots of crushed candi in Sweet Pea and Vintage Dots (Honey) .

I've layered up flowers from the pad and added candi centres.


I then discovered some Craftwork Cards retro daisies in my embellishment box and realised i had candi to match!

The card blank was covered with some black/gold shimmery paper and i've used candi again in the bottom left corner to make another flower shape. A new black and silver sentiment in the centre finishes the card.

And finally here's the card from last night - I love making my little flowers while sitting watching the tv - I can keep my hands busy and spend time with hubby! 


As much as this is traditional Christmas colours - red, green and gold - the 'With Love' sentiment doesn't necessarily tie it to Christmas. 

Ok.... so for those of you who did have a look at yesterday's blog post... you will know that my daughter made a card using the Tsunami Rose Vintage Rounge in Black and Pink that I used on my card yesterday and a few of you said you'd like to see it... so here goes...

I had covered the base card with the Vintage Rouge paper and cut a doily and attached it at either side the rest of the work is Sariah's (age 7.5years).


She coloured the doilies, wrinkling the edges to distress them, then added lots of glitter glue in red and silver. She's also added silver 'present' peel offs and a black birthday peel off at a jaunty angle in the centre. She's finished the card with a red bow that she asked me to make for her and she attached a flower gem onto. And, of course, some pink card candi with silver glitter completes the card! 

Mo xxx 

Tuesday 19 March 2013

A Very Exciting Announcement!

I am freezing!!! There a mountain of snow outside and it hasn't stopped in about 14hours! Its crazy snowy here! But I have some fabulous news to warm my soul!

I discovered Tsunami Rose Designs via Pinterest a few months ago - I found a pin board full of card sketches including some that i've used on the blog here before and a load from Tsunami Rose. I hopped over to follow them on Facebook and love looking at the myriad of inspiration on their blog. The designs are digital papers to be downloaded and printed to your heart's content! Journal kits, 6x6 and 12x12 papers, mixed printed ephemera, beautiful stunning designs - they are mixed with your stash... ribbons, buttons, pearls, glitters, lace to make vintage inspired cards, layouts and altered art - totally yummy designs!

So imagine my excitement when Tsunami Rose Designs put out a Design Team call on their Facebook page! I sent them a message and heard back from the lovely Daisy Collins - designer extraordinaire! I've been accepted! So watch this space in the next few weeks for Tsunami Rose DT duties!

Today though, I have a beautiful paper to show you all - Vintage Rouge in black and Pink - available for download from Tsunami Rose Designs here.

I really wanted my first effort to be fab and i'm not entirely sure this is! I started a couple of projects with this paper and my 7year old daughter has actually made a better card than mine i think! Maybe if i'm brave enough I'll show you some of her work tomorrow!


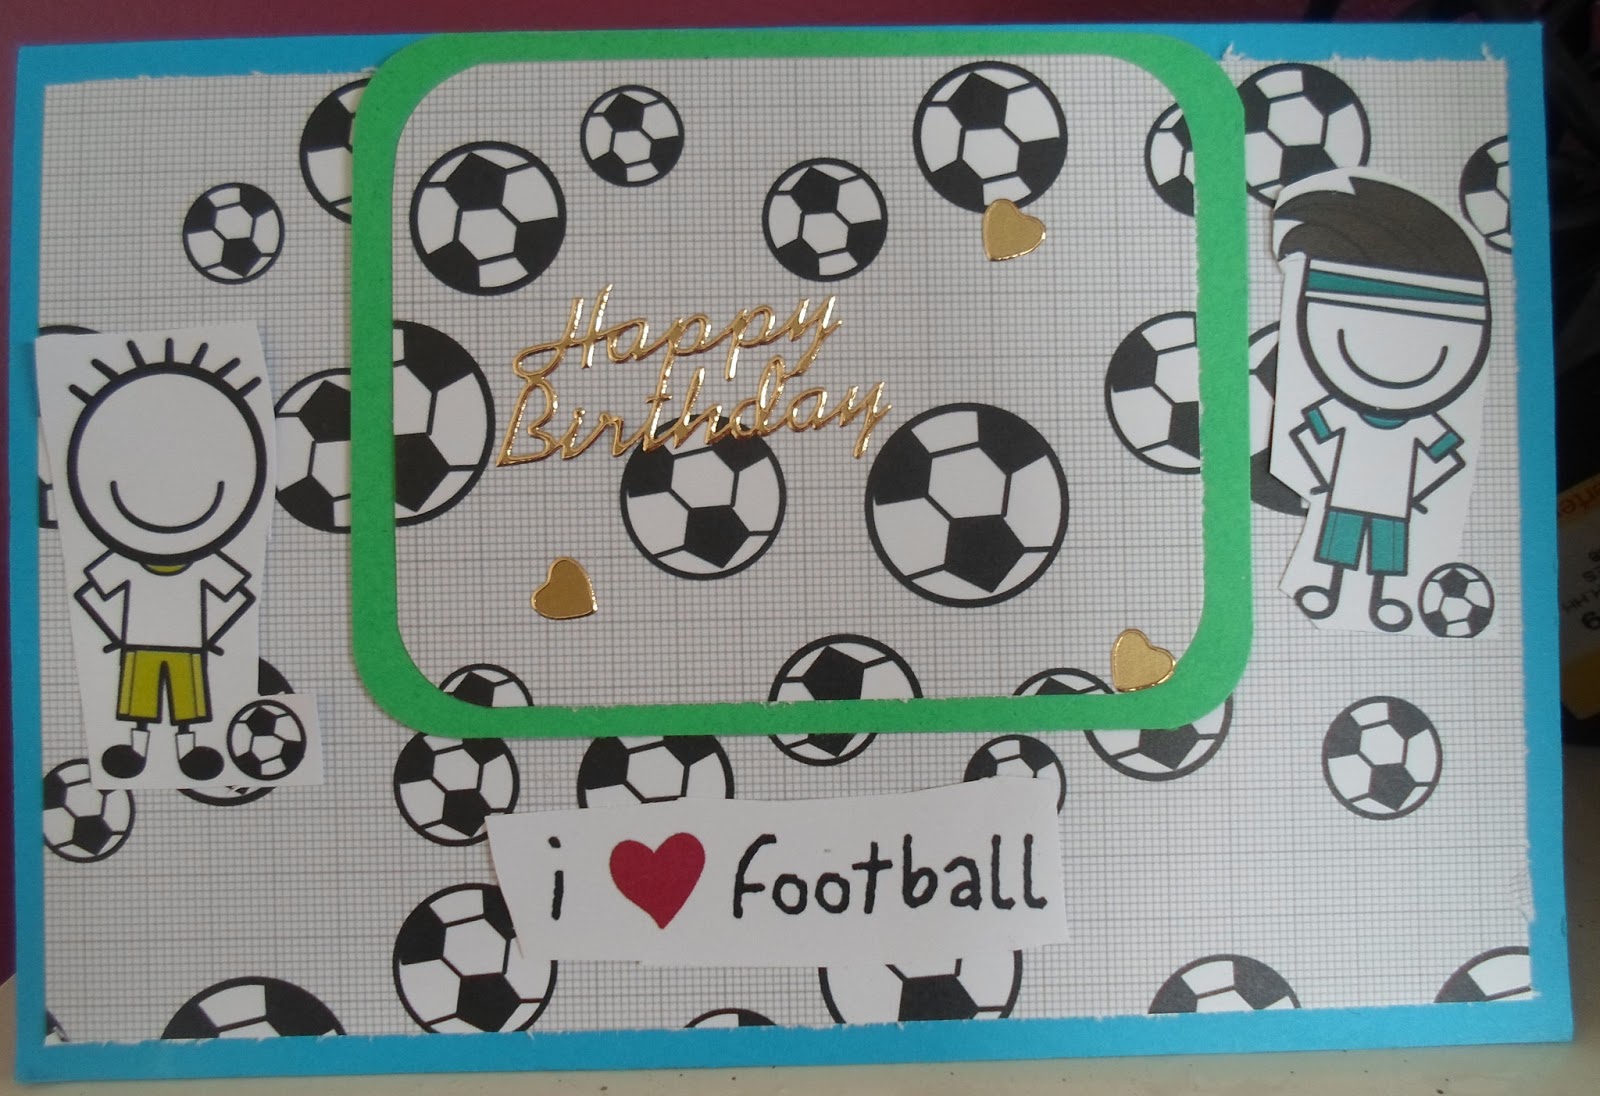
This is a 6x6" square card blank tinted round the edges with Vintage Photo distress ink and stamped using Black Tuxedo Memento using stamps by Craftwork Cards. The tag started out life as lilac which i again tinted with vintage photo and some black round the edges. I cut the Vintage Rouge paper to match the tag, distressed the edges with a Tim Holtz paper distresser tool and more Vintage Photo. Curled edges add to the effect.


I added some lace ribbon and white opal Liquid Pearls and a segment of a paper doilie. I cut a few spirals of Vintage Rouge and some black paper so make into flowers and adhered - adding more liquid pearls in the patterned paper and Star Dust stickles in the black flowers.


Some black satin ribbon was added along with a few crystal accents and a distressed sentiment in the same colours. I then adhered the tag to the base card.


Another shot of the finished card from the side i an attempt to show the depth of the embellishments. I didn't put the tag on 3D foam as the flowers are quite deep already.

I really hope you like this, my first make for Tsunami Rose Designs! I very much look forward to joining the team and creating more inspiration for you with their fabulous designs.

Mo xxx

You can find Tsunami Rose Designs here and join in with their weekly challenge on a Wed!

Tsunami Rose Blog: http://tsunamirosedesigns.blogspot.com/
Tsunami Rose Zibbet shop: http://www.zibbet.com/tsunamirose
Tsunami Rose Etsy Shop: http://www.etsy.com/shop/TsunamiRose
Tsunami Rose Facebook Page: http://www.facebook.com/tsunamirosegraphicdesign
Tsunami Rose Facebook Group: http://www.facebook.com/groups/tsunamirosedesigns/

Monday 18 March 2013

Gorjuss Altered Board Book

I have been exploring the phenoma of Altered Art this week and in my travels I came across this Altered Board Book by Lydia Levy a DT member over at Tsunami Rose Designs. She uses a child's board book - the thick pages and excellent binding make it very good for altering, it is thick and sturdy and you dont need to bind it yourself - check out her YouTube tutorial and see what you think!
She has used a gorgeous set of printable papers by Tsunami Rose called Life Abloom - a beautiful set!

As you may know, I have four children and we are surrounded at times with books - many of which have been chewed by one or more of said children - but I took myself off to the bedrooms in search of something to use! I found a small book, only 10 pages, inclusive of the covers, - the kind you get in a small 'library', maybe with 6 in a box.... this one used to be a tale of Piglet and Roo! It had been altered somewhat already - ie someone took a colouring pen to it!!! But no signs of chewed corners - all still smooth and straight so I took it to my desk and pulled out the Ultimate A4 Die-Cuts pack and my 6x6 papers - all from the new DoCrafts/Santoro Gorjuss range.


I covered each page with the papers and added some stripey Gorjuss paper to the spine, with a ribbon detail. The edges of the book were painted with black acrylic as were the fold lines between each page, some paint was added to a couple of the pages for detail too.


 I embellished the front with some crushed card Candi and some die cuts, and added 'with love' to a banner.


As I started to add ribbons and images to the pages, I was inspired to make this a creation to give to my neice. Her name is Sky and she's having a hard time right now - I added her name in Gorjuss sticker letters and made it say 'The SKY's the limit!'


I added polka dot ribbon pulls for opening the pages. And added some wording on a few tags inside. 


I found a few quotes that I think she will appreciate and hand wrote these on a couple of the pages - using the lines of the papers as a guide.


This is, in my mind, a very simple example of an altered book. The board style book leaves no room for 3D work inside - otherwise the book will not close. I thought about adding a pocket and tag but may put something like this on the back with a tag that pulls out - I will update this post if i do decide to add that.

I am happy with how this has turned out and I am very much looking forward to doing another altered book project - perhaps a notebook/journal, something with more scope for 3D work, pockets, embellishments throughout. Watch this space!

Mo xxx

Sunday 17 March 2013

Gorjuss new Gorjuss-ness!!

I love all things Gorjuss Girls - the artist who created these quirky is from Glasgow and her paintings have made me smile for several years now. I have a few bags, lots of buttons, emery boards, prints, calendar, dairy, tins, and more tins. And lots of decoupage and toppers sheets, and now new 6x6 and 12x12 papers, A4 decoupage, ribbons, buttons and mini notelets and a list of more Gorjus stuff i want to get next month! The new papers and embellishments are from DoCrafts and I want them all!!


I love the papers and found it very hard to start cutting! But, I started with a tunnel card blank from Craftwork Cards and took it from there. The inside was covered with a red paper and another red paper used to cover the shape from the front of the card. The topper I used is called 'I Found My Family In a Book' and I thought the black Card Candi with white writing was apt for use here! I crushed it and stuck it around the edges of the shape, added the toppers and some ribbon and some tags were added to accent the 3D effect inside the card.


I tinted the front of the card with Tim Holtz Distress ink in Fired Brick and added Vintage Photo to the edges. A black fine liner gives faux stitching effect around the apperture and iconic Gorjuss stripey paper was distressed and added down the outer edges for detail.


I hand cut some spirals in the same red papers to make 3D flowers for the front and added twirly bits!
More crushed candi and some ribbon along with a tag and Gorjuss letter stickers finish the card.


I think its quite Gorjuss! I hope you do too!
Mo xxx


Wednesday 13 March 2013

WOYWW #197 and my first Tunnel Card!


I had a productive day yesterday and here's hoping today is similar! I took this wee photo of my desk last night before putting away yesterday's makes and cleared up ready for today - i'm popping this photo onto today's 'What's on Your Workdesk Wednesday?' over at Stamping Ground. I'd also like to direct you all over to Kath Stewart's blog!! Kath is a design team member for Craftwork Cards and she also takes part in WOYWW.... and today she's got a fabulous Craftwork Cards giveaway too!!!

My first Gorjuss card with my new papers is there, and the 'Thank You' card from yesterday's blog post. I'm slowly building my collection of distress inks and i have a 'reference' card on my cupboard door there - it has samples of the colours with the name under for quick easy choice - i have the same strip of colour on the base of each ink pad so i dont have to rummage through them all - quick and easy! My daughter's school homework is there too as she likes to sit at my desk to work!

But my favourite make from yesterday is my first attempt at a tunnel card! I have gotten a whole truck load of inspiration this week from the Craftwork Cards blog - Tina and Mel both posted several amazing cards on the blog yesterday using the Floral Fusion papers and tunnel cards and kraft flowers and I was totally inspired to go do one myself!


I played around with distress inks and my foam blending tool on the new kraft flowers and posted this piccie on my facebook page yesterday. I've used 'crushed olive' on the leaves and cut them apart and glued them to the back of the largest flower - its coloured with 'brick red' as is the smaller flower. The others are coloured with 'Dusty Concord' and I used that same colour to tint a length of jute.

I popped this onto the centre of a tunnel card and used a Craftwork Cards birthday sentiment and more coloured kraft flowers and my new favourite Card Candi - purple with pearly white stars!
Here are a few close ups of the finished card from my table!


I have glittered sections of the flowers and added a card candi to the centre and mounted it on the die cut piece that i covered with purple gingham paper. I've used 'Dusty Concord' to tint the edges of the gingham paper and the edges of the card. I've also used a fine liner to edge around the aperture.


My purple ribbon was white and ive tinted that with the same Dusty Concord.


This bottom left flower is the pop out segments of the flowers and some extra purple candi!


I hope you like it!!!
Mo xxx


Tuesday 12 March 2013

Thank You Card

A quick blog post from me today! I got some fabulous new Craftwork Cards goodies at the Hobbycrafts craft fair at the SECC last Friday and couldn't wait to get stuck into the goodies! I've got lots more to show you including some absolutely gorgeous Gorjuss papers and toppers but that will have to wait till i've got a bit more time on my hands!

So for this quick card today, i've used the new gingham papers from the Floral Fusion papers at Craftwork cards - these were included in the Guys and Dolls Goodie Bag that i picked up on Friday - you can get the papers and other elements over at their website. 

This is a quick easy card, using a 6x6" card blank, some white pearl paper on the background, with the gingham papers matted onto kraft cardstock, a 'Thank you' sentiment matted the same way and some fabulous kraft flowers and of course candi! A length of black twine is wrapped around the blue papers and lots of dimension by using 3D foam and pinflair glue gel to layer the big flower.


Here's a close up of the main flower - i've put some crushed kraft candi in the centre and used Star Dust Stickles in the middle of each. Each petal has been bent out of shape to give extra dimension - i think my next card wil have even more layers!


Well, this card will be winging its way to a special lady who has been very generous with her time and talents and has been a big inspiration to me in recent weeks. Will let you know her verdict!

Mo xxx